No kneading is necessary to make crusty handmade artisan bread. Inside is soft, and the crust has a delicious crunch to it.
an Artisan Bread Recipe for no-knead bread that doesn’t require special tools, stand mixers, or dough hooks? YES! You will adore how simple and forgiving this recipe is if you have never baked bread before.
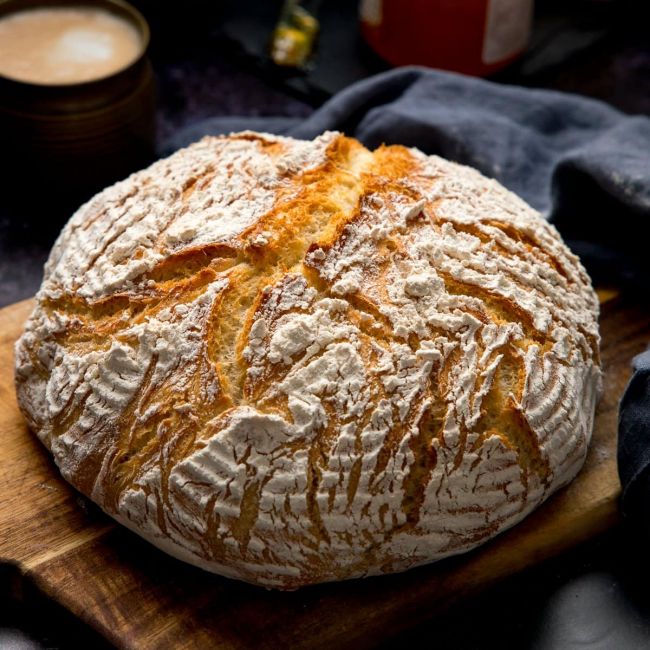
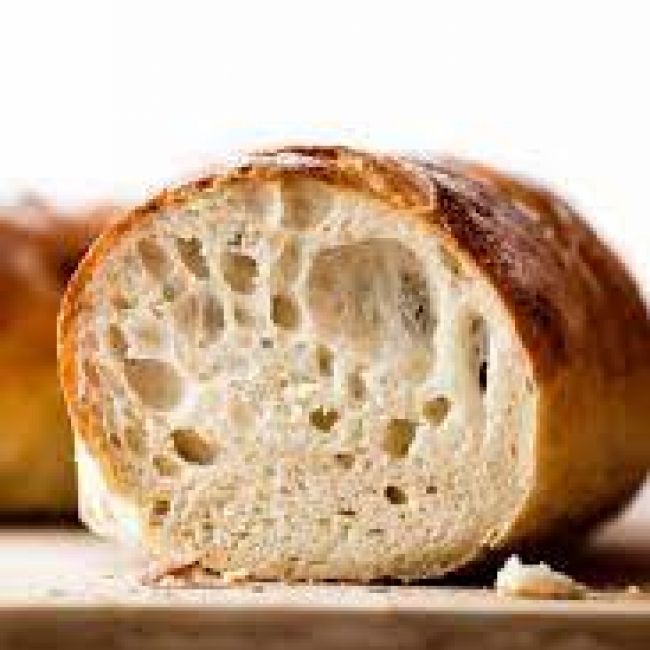
Bread fans will enjoy the soft open crumb that is akin to Ciabatta and has a thick, chewy crust that is ideal for slathering with butter. In less than three hours, you can have fresh, warm Artisan Bread recipes on the table!
 (most print) Artisan Bread Recipe
Bakery bread
I am aware that it seems too good to be true. Easy-peasy fluffy, crusty bread? No way. However, we have been baking this dish almost every week since we discovered it for the first time a few years ago.
You will now, too! Baking novices, rejoice—no intimidation necessary!
Nothing compares to the scent of hot steam escaping from freshly baked bread as you tear it apart while being overcome by the heady aroma of sweet carbohydrates.
To get chewy bread drenched in flavor, dip it into a hot bowl of chicken soup or chili.
FLOUR: Due to the higher protein level in bread flour, the resulting bread is softer and fluffier. Plain or regular all-purpose flour also works fantastically, with barely any texture change.
Use roughly 1/4 cup less wholewheat flour and, if necessary, add more as you go when using it.
SUGAR: The ideal combination in bread dough for yeast to feed on is sugar and starch. As the mixture bakes, carbon dioxide gas is released, causing the bread to rise.
The dough is pushed up and out by the bubbles, giving it a soft, spongy texture.
YEAST: Over the years, we’ve tried this recipe with dry, instant, and rapid-rise yeast. We discovered that the dried yeast did not require activation before being combined with the dry components.
If you’re unsure, feel free to activate it for a few minutes in warm water and oil before adding the remaining ingredients.
NOT TOO HOT: If the water is too hot, your yeast will be killed. 55°C, or 130°F, is the ideal temperature.
The finger test is another option; if you stick your finger in the water and it feels warm, the water is OK. Allow it to cool down just enough to become warm if it burns.
For around two hours, wrap in plastic and place in a warm, draft-free area. The dough will expand to twice its original size, and you could become alarmed as bubbles start to appear on the surface.
The consistency will be extremely sticky and like jelly. BEGIN AGAIN On the right path, you are.
Sprinkle up to 1 tablespoon of flour on your work surface AND spatula to lightly dust them. Scrape the dough from the bowl onto the work surface, sprinkle it with a little flour, and fold it five to six times inward.
With your spatula, transfer the dough to a sizable sheet of parchment paper and form it into a rough, round shape. The main purpose of this is to release some of the air!
Use oven mitts to carefully remove your hot saucepan. Grab the parchment paper’s ends and then lift the dough into the pot.
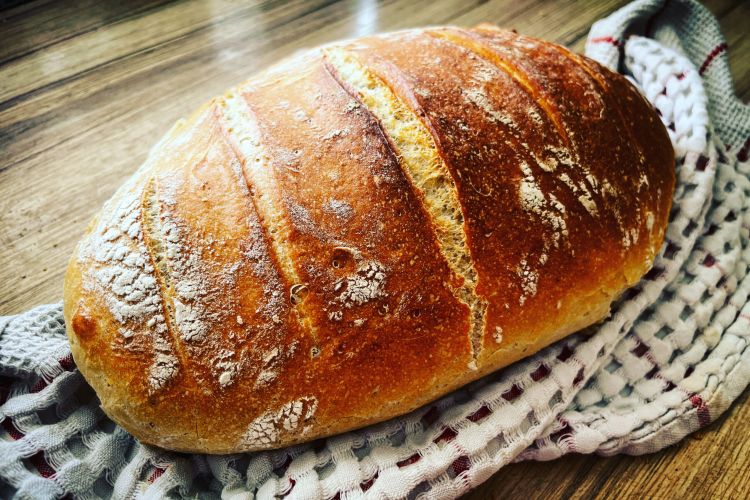
Don’t forget to replace the lid. Bake your bread before the crust forms, this generates steam. Remove the lid and bake for an additional 12 to 15 minutes to achieve that golden, crunchy crust.
The moment it comes out of the oven, you won’t believe how delicious it looks. All the cracks!
Before slicing into it, allow it to cool so the bread’s center can finish baking. Prepare to have your mind blown by adding butter! This homemade bread recipe will change your life if you love bread!
more recipes for bread
- Simple Soft Dinner Rolls (EGG FREE + NO MIXER)
- Simple Cheesy Garlic Bread
- Rolls of Soft Cinnamon
- Cross Buns, Hot
 (most print) Artisan Bread Recipe
INSTRUCTIONS
- In a sizable bowl, mix the flour, sugar, yeast, and salt. Oil and water should be added, and everything should be combined. The dough will be sticky, moist, and shaggy.
- Cooking oil spray should be used sparingly on the top. Wrap in plastic wrap then covers with a dry tea towel.
- Leave for two to three hours, or until it has doubled in size, in a warm, dry location. The dough will be shaky and filled with several tiny holes or bubbles.
- Using a lid, place a big (10-inch or 26-cm) dutch oven or heavy pot in the oven. 30 minutes before baking, preheat the oven to 450°F (230°C).
- Add up to 1 tablespoon of flour to the work surface and a plastic spatula to lightly dust them. Use a spatula to scrape the dough from the bowl and onto the work surface. With the spatula, fold the dough in half and generously dust the top with flour (about 5-6 folds). Form a somewhat rounded shape.
- The dough can be placed on a large piece of parchment paper that has been measured out. Roll the dough onto the paper, smooth side up, after placing a piece of paper next to it. To distribute the dough evenly, carefully move it to the center of the paper and reshape it as necessary. (While baking, it will even out.)
Carefully remove the hot Dutch oven from the oven using oven mitts. To pick up the dough and place it in the saucepan, take a piece of parchment paper from either end.
After baking for 30 minutes with the lid on, remove the lid and bake the loaf for an additional 12 to 15 minutes, or until it is gorgeously golden brown.
Before slicing, transfer to a wire rack to chill for 10 minutes.
NOTES
- FLOUR: Due to the higher protein level in bread flour, the resulting Artisan Bread Recipe is softer and fluffier. Plain or all-purpose flour also works fantastically, with only a small difference in texture.
- SUGAR: The ideal combination in bread dough for yeast to feed on is sugar and starch. As the mixture bakes, carbon dioxide gas is released, causing the bread to rise. The dough is pushed up and out by the bubbles, giving it a soft, spongy texture.
- YEAST: Over the years, we’ve tried this Artisan Bread Recipe with dry, instant, and rapid-rise yeast. We discovered that the dried yeast did not require activation before being combined with the dry components. If you’re unsure, feel free to activate it for a few minutes in warm water and oil before adding the remaining ingredients.
- Our bread gets even softer because of OIL. This cunning little touch is necessary for a silky, soft crumb.
- Warm water is ideal since hot water will kill the yeast. 55°C, or 130°F, is the ideal temperature. The finger test is another option; if you stick your finger in the water and it feels warm, the water is OK. Allow it to cool down just enough to become warm if it burns.
- RISING TIME can change depending on a few factors, like humidity levels, ambient temperature, various flours, various yeasts, etc. Follow the bubbly surface as a direction. The dough is prepared to be used as directed in the recipe above as long as it doubles in size. Keep in mind that yeast prefers warmer temperatures.
- I came across this dish for the first time on Pinch of Yum and The New York Times.